Needles Explained: The Complete Guide to Embroidery and Sewing Machine Needles
"The smallest tool in your machine may have the biggest impact on your results."
Most embroiderers will happily spend hours choosing the perfect thread, stabilizer, fabric, or design. Yet one of the most important tools in the entire embroidery process is often ignored until something goes wrong.
A needle costs only a fraction of what we spend on supplies, but every single stitch depends on it.
Thread breaks, skipped stitches, poor registration, fabric damage, looping, shredding thread, and even machine damage can often be traced back to a simple culprit: the wrong needle, a worn needle, or a damaged needle.
Whether you own a domestic embroidery machine, a commercial multi-needle machine, or enjoy both sewing and embroidery, understanding needles will dramatically improve your results.
Let's start with the question many embroiderers ask first.
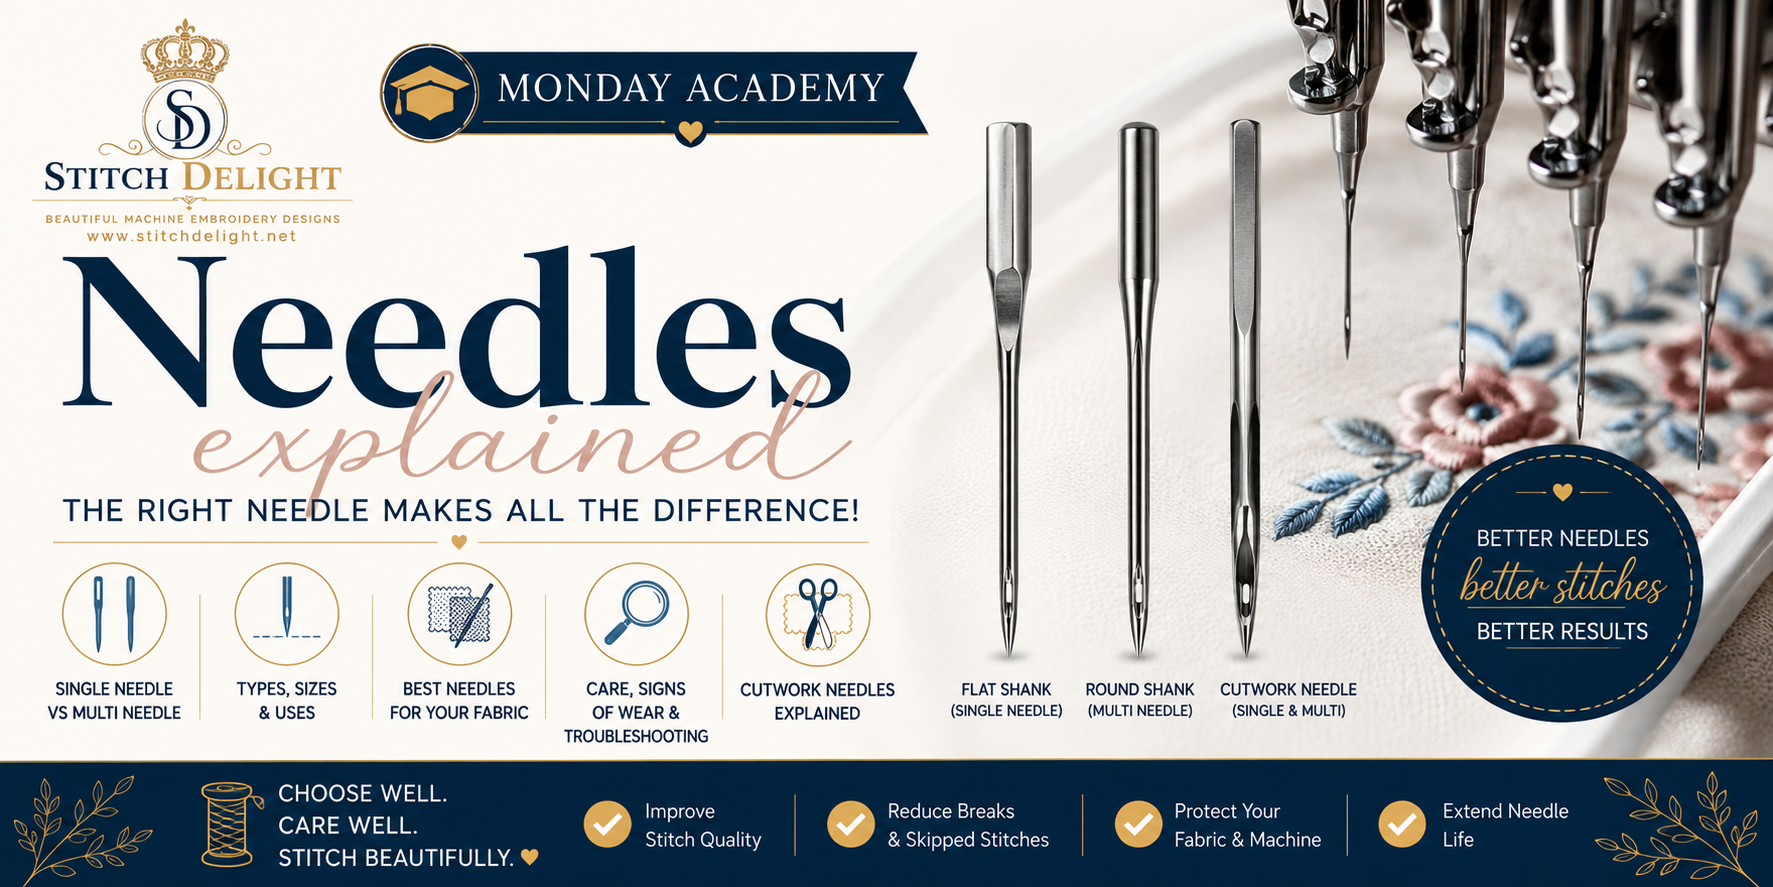
Single Needle vs Multi-Needle Machine Needles
At first glance, embroidery needles appear almost identical.
However, there is one major difference.

Single Needle Machines
Domestic embroidery and sewing machines use a flat shank needle.
One side of the shank is flattened, making it impossible to install the needle incorrectly.
The flat side ensures the needle is always positioned correctly for stitch formation.
Examples include:
-
Brother embroidery machines
-
Janome embroidery machines
-
Bernina embroidery machines
-
Husqvarna Viking machines
-
Most home sewing machines
These needles are commonly identified as:
-
130/705H
-
H-E Embroidery Needles
Multi-Needle Machines
Commercial embroidery machines use a round shank needle.
Unlike domestic needles, the shaft is completely round.
This allows technicians to position the needle with extreme precision for high-speed embroidery.
Examples include:
-
Tajima
-
Barudan
-
SWF
-
Happy
-
Ricoma
-
Melco
- Galaxy
These machines commonly use needle systems such as:
-
DBxK5
-
DBx7
-
SES
Although both types perform the same basic task, they are not interchangeable.
Using the wrong system can result in poor stitch formation or machine damage.
Why Needles Matter More Than Most People Realize
Every stitch begins with the needle.
Its job is to:
-
Pierce the fabric
-
Protect the thread
-
Create a stitch loop
-
Allow the hook to catch the thread
-
Minimize fabric damage
And it must do this thousands of times per minute.
Even a perfectly digitized design can fail if the wrong needle is installed.
Understanding Needle Anatomy
Once you understand the parts of a needle, troubleshooting becomes much easier.

The Shank
The portion held by the machine.
This is where domestic and commercial needles differ.
The Shaft (Blade)
The main body of the needle.
Its diameter determines the needle size.
A thicker shaft provides greater strength but creates a larger hole.
A finer shaft creates smaller holes and better detail.
The Long Groove
This groove runs down the front of the needle.
Its purpose is to protect the thread as the needle penetrates the fabric.
Without it, thread would quickly shred.
The Eye
The eye carries the thread.
Different needle types have different eye sizes.
Metallic and specialty needles often feature enlarged eyes to reduce friction.
The Scarf
The scarf is the indentation above the eye.
It allows the rotary hook to catch the thread loop.
This tiny feature is critical to proper stitch formation.
The Point
The point determines how the needle enters the fabric.
Different fabrics require different point styles.
And this is where many embroidery problems begin.
Choosing the Correct Needle Point
Not all needle tips are created equal.
Using the wrong point can damage fabric and reduce stitch quality.

Sharp Needles
Sharp needles cut directly through fabric fibers.
Best for:
-
Linen
-
Cotton
-
Quilting fabrics
-
Woven fabrics
For embroiderers working on Belgian linen, a sharp needle often produces the cleanest and most professional results.
Ballpoint Needles
Ballpoint needles do not cut fibers.
Instead, they push them aside.
Best for:
-
T-shirts
-
Jersey knit
-
Stretch fabrics
-
Activewear
Using a sharp needle on knit fabrics can cause runs and permanent damage.
Stretch Needles
Stretch needles are designed specifically for highly elastic fabrics.
Best for:
-
Swimwear
-
Lycra
-
Dancewear
-
Sportswear
Their modified scarf helps prevent skipped stitches.
Needle Sizes Explained
Many embroiderers leave the same needle in their machine for every project.
While this often works, understanding needle sizes allows you to optimize results especially if you are troubleshooting a poor stitchout or fabric puckering even after you stabilized well, made sure its not too dense for the fabric you choose etc.

65/9
Best for:
-
Organza
-
Fine cotton
-
Lightweight fabrics
-
Delicate details
75/11
The workhorse of embroidery.
Best for:
-
General embroidery
-
Cotton
-
Linen
-
Most garments
If you're unsure which size to use, this is usually the safest choice.
80/12
Best for:
-
Towels
-
Sweatshirts
-
Denim
-
Medium-heavy fabrics
90/14
Best for:
-
Heavy fabrics
-
Dense embroidery
-
Specialty threads
-
Thick stabilizer combinations
Embroidery-Specific Needles
Embroidery needles are not simply sewing needles with a different label.
They are engineered specifically for embroidery thread.

Features include:
-
Larger eye
-
Larger scarf
-
Improved thread protection
-
Better performance at high speeds
This is especially important when using rayon or polyester embroidery thread.
Metallic Needles
If you've ever struggled with metallic thread, the needle may be the problem.

Metallic needles feature:
-
Enlarged eyes
-
Special grooves
-
Reduced friction
Benefits include:
-
Fewer thread breaks
-
Less shredding
-
Improved stitch quality
For many embroiderers, switching to a metallic needle instantly solves metallic thread frustrations.
Cutwork Needles: The Needles That Actually Cut Fabric
Most needles create stitches.
Cutwork needles create stitches and cut fabric.

These specialty needles are used for:
-
Lace
-
Eyelets
-
Richelieu embroidery
-
Decorative openings
The machine stitches the design first and then uses specially designed cutting needles to remove fabric.
The result is beautiful heirloom-style embroidery that appears almost impossible to create by machine.
How to Tell When a Needle Needs Replacing
One of the biggest mistakes embroiderers make is waiting until a needle breaks.
By then, stitch quality has often been declining for some time.

Replace your needle if you notice:
-
Thread breaks
-
Skipped stitches
-
Looping
-
Fabric damage
-
Poor stitch quality
-
Popping sounds while stitching
Many commercial shops replace needles every 8–12 hours of embroidery time, but they do stitch very long continuous hours, so judge how long you stitch OR check your needle carefully, especially if you run into poor stitching quality.
The Hidden Dangers of a Bent Needle
A needle doesn't need to break to cause problems.
Even a slight bend can create serious issues.
A bent needle can cause:
-
Thread shredding
-
Thread breaks
-
Skipped stitches
-
Poor registration
-
Needle strikes
-
Hook damage
-
Timing problems
The most expensive embroidery repairs often begin with a damaged needle.
If you suspect a bend, replace the needle immediately.
Needle Care: Small Habits That Save Money
Needles may be inexpensive, but proper care extends their life and improves stitch quality.
Store Them Properly
Keep needles in labeled containers.
Avoid mixing sizes.
Replace After Accidents
If a needle hits:
-
A hoop
-
A pin
-
A frame
-
A presser foot
Replace it immediately.
Microscopic damage may not be visible.
Keep Spare Needles Available
The worst time to discover you need a new needle is halfway through a project.
Always keep several replacements on hand.
What About Used Needles?
Retired needles still have a few useful jobs left.

Many sewists use old needles for:
-
Cleaning lint from tight spaces
-
Applying glue
-
Cleaning adhesive bottle tips
-
Scratching transfer marks
-
Fine craft work
However, once a needle is retired from sewing or embroidery, it should never return to the machine.
Safe Needle Disposal
Never place loose needles into household rubbish.
They can injure:
-
Family members
-
Pets
-
Waste handlers
-
Recycling workers
Instead:
-
Collect used needles in a pill bottle or screw-top container.
-
Label it clearly.
-
Dispose of the sealed container safely.
Beyond Embroidery: The Fascinating World of Specialty Sewing Needles
If you thought embroidery needles were specialized, wait until you discover what exists in the sewing world.

There are needles specifically designed for:
-
Leather
-
Denim
-
Quilting
-
Metallic threads
-
Decorative stitching
-
Heirloom sewing
-
Stretch fabrics
-
Free-motion quilting
And then things get really interesting.
Twin Needles
Twin needles contain two needles mounted on a single shank.
They create two perfectly parallel rows of stitching simultaneously.
Most commonly used for:
-
T-shirt hems
-
Decorative stitching
-
Pintucks
Triple Needles
Triple needles create three rows of stitching at once.
Often used for decorative effects and specialty garment construction.
Wing Needles (Butterfly Needles)
These are among the most beautiful specialty needles available.
Wing needles have wing-like projections that push fabric fibers apart to create decorative openings.
Best for:
-
Heirloom sewing
-
Linen tablecloths
-
Napkins
-
Decorative borders
The result resembles delicate hand-crafted hemstitching.
Leather Needles
Leather needles feature a chisel-shaped point.
Rather than pushing fibers aside, they cut a small slit through leather.
Perfect for:
-
Genuine leather
-
Suede
-
Faux leather
But never use them on woven fabrics, as they permanently cut the fibers.
Denim Needles
Designed for:
-
Jeans
-
Canvas
-
Heavy cottons
-
Upholstery fabrics
Their stronger shafts resist deflection and breakage.
Topstitch Needles
These feature larger eyes and deeper grooves.
Perfect for:
-
Heavy decorative threads
-
Visible topstitching
-
Contrast stitching
The Secret Most Experienced Sewists Know
When stitching quality suddenly improves, it is often not because they purchased a better machine.
It's because they matched the correct needle to the fabric, thread, and technique.
The right needle makes embroidery smoother.
The right needle protects your fabric.
The right needle reduces frustration.
And sometimes, the right needle is the difference between a project that looks homemade and one that looks professionally crafted.
The next time your embroidery or sewing isn't behaving the way it should, don't immediately blame the thread, stabilizer, design, or machine.
Start with the needle.
You may be surprised how often the smallest tool provides the biggest solution.

4 comments
Frances Wright
Very intereseting and informative.
Diva
Needles Explained:
The article is bar far the very " Best" that was easy to read and extremely helpful & valuable.
Thank you ever so much
Diva
Diva
Needles Explained:
The article is bar far the very " Best" that was easy to read and extremely helpful & valuable.
Thank you ever so much
Jean Tilanus
Thanks for a great article . I often used microtex needle for sewing duchess satin – worked well leaving no puckers.